Server Method Invocation (SMI) facilitates the front-end component of an app to invoke a server method that runs as a serverless component.
To build an SMI app,
- Create a serverless app.
- Configure the app manifest.
- Register the SMI functions: In the manifest.json > modules.common.functions object, specify all the server methods that are called from the front-end component of the app, to allowlist the methods.
- Navigate to server.js and enter your app logic.
- Navigate to the root folder and create an app folder to host the app’s front-end files. For information on the app folder structure, see Create a front-end app.
- In the app folder, create an app.js file and enter the app logic for the front-end component. Use our front-end methods - app lifecycle methods, data methods, events methods, and interface methods - to formulate your app logic.
- Invoke the serverless component: In app.js, specify the method to invoke the serverless component and pass an appropriate payload to the serverless component. By default, the serverless environment adds the installation parameters set during app installation to the payload.
- Navigate to server.js and and enter your app logic. Use our serverless events - app set-up events, external events, and scheduled events - to formulate your app logic.
- Define the server methods: In server.js, define the server method (SMI function) that is allow-listed in the app manifest and called from the front-end component. In this server method, include the app logic that runs based on the payload passed and the renderData() method to return success and failure responses to the front-end component.
- Use our developer tooklit to help solve specific requirements of your app.
Use our app UI guidelines or Crayons (the Freshworks component library) to construct your app’s UI.
- Configure app settings.
- The rate limit for the serverless component is 50 triggers per minute.
- The payload passed to the severless component should not exceed 100 KB.
- The default app execution timeout is 20 seconds. If the request timeout is increased to 20, 25, or 30 seconds, the app execution timeout is extended to 40 seconds.
- To know all the platform restrictions and constraints, see Rate limits and constraints.
Configure manifest and register SMI functions
After creating a serverless app’s files, to configure the app manifest for an SMI app , from the app’s root directory, navigate to manifest.json.
App manifest attributes - description and how to configure them
- platform-versionstring
Platform version you use to build the app. This value is auto-generated when you create the default app files by using the fdk create command
- modulesobjectRequired
Specifies all modules on which the app can be deployed.
When you create an app by using the fdk create command, the default app manifest is created with the common and support_ticket modules. You can edit the app manifest and replace the support_ticket module or add additional modules.Important:- The app manifest must contain at least one module (apart from the common module).
- Even if your app is built only for the common module, ensure that the modules object contains at least one module in addition to the common module. In this case, the other module(s) can be an empty JSON object. This other module’s name ties the app to the product on which the app is eventually deployed.
- commonobjectRequired
Specifies the common placeholders where the front-end component of the SMI app is deployed and common events that the app responds to. Common placeholders and events are placeholders and events that are not specific to a module.
- locationobject
Details of the common location(s) where the front-end component of the app is rendered.
For an SMI app, this attribute is not a default attribute. When building the app, include this attribute along with its child attributes.
For information on all available common placeholder locations where your front-end app can be deployed, see Include common placeholders.- <placeholder-name>objectRequired
Name of the placeholder where the front-end component of the SMI app is rendered.
When you build an SMI app, enter the placeholder name pertaining to your app and the appropriate placeholder information in the child attributes.
For information on all available placeholder location names, see Include common placeholders.- urlstringRequired
Relative path from the app project directory to the index.html file based on which the UI component of the app is rendered. The contents of the index.html file are used to render the app in an IFrame at the specified placeholder location.
Default value: index.html (file in the app directory). When you build an app, you can modify the default url value and the name of the index.html file.
Caution:If you modify the template.html filename, ensure to specify the correct path and filename as the url value. - iconstringRequired
Relative path from the app project directory to an image file (in SVG format). The image is used as the app’s icon when the app is rendered on the UI. Ensure that the resolution of the image is 64 x 64 pixels.
Default value: icon.svg (file in the app directory). When you build an app, you can modify the default icon value.
Caution:If you store your app icon with a name other than icon.svg, ensure to specify the correct path and filename as the icon value.
- eventsobjectRequired
Various common serverless events and the corresponding callback function/method names, specified in the following format:
"events": {
 "<eventName1>": {
    "handler": "<callbackFunctionName1>"
 },
 "<eventName2>": {
    "handler": "<callbackFunctionName2>"
 }
}
Subscribe to common events through event listeners: When you build a serverless app, replace the default values in this attribute with the events pertaining to your app. For app setup events, <eventName> is onAppInstall, onAppUninstall, or afterAppUpdate. For external events, <eventName> is onExternalEvent. For scheduled events, <eventName> is onScheduledEvent.
Register callback: In <callbackFunctionName> enter the name of the callback method defined (or planned to be defined) in server.js. Ensure that for each event, only one callback is registered.Important:Common events are events independent of the product on which the app is deployed. So, ensure not to configure product events in common.events. Configure product events in the corresponding <module_name>.
- requestsobject
All configured request templates that the app code uses, for a product, in the following format.
Notes:"requests": { "<requestTemplateName>":{ "<option-name>": "<option-value>", "<option-name1>": "<option-value1>" … }, "<requestTemplateName1>": {} … }- <requestTemplateName> must be the same as that configured in config/requests.json.
- Possible values of <option-name> are maxAttempts, retryDelay, and oauth. If an option is specified in both manifest.json and config/requests.json, the option value specified in manifest.json takes precedence.
Important:In the default app manifest, created through the fdk create command, the requests object is not present. If your app code uses request templates, ensure to configure the requests object.
- functionsobjectRequired
SMI functions (server methods) defined in the exports code block of server.js, specified in the following format:
"functions": {
 "<serverMethodName1>": {},
 "<serverMethodName2>": {}
}
Register the SMI functions: The functions attribute is not a default attribute. When you build an SMI app, include the functions attribute, to allowlist the SMI functions that are defined in server.js.
Note:If the front-end component tries to invoke a function/method that is not registered in the app manifest, the fdk run or fdk validate commands display the error message Requested function not found or registered.
- <module-name>objectRequired
Contains the module-specific events that the app can respond to. The events must be compatible with the module identified by <module_name>.
In the default app manifest, created through the fdk create command, the <module-name> is support_ticket. You can edit the module name to replace it with the module where you want your app to be rendered. You can also add new modules, in addition to the support_ticket module.- locationobject
Details of the module-specific location(s) where the front-end component of the app is rendered.
For an SMI app, this attribute is not a default attribute. When building the app, include this attribute along with its child attributes.
For information on all available module-specific placeholder locations where your front-end app can be deployed, see Module introduction.- <placeholder-name>objectRequired
Name of the placeholder where the front-end component of the SMI app is rendered.
When you build an SMI app, enter the placeholder name pertaining to your app and the appropriate placeholder information in the child attributes.
For information on all available placeholder location names, see Module introduction.- urlstringRequired
Relative path from the app project directory to the index.html file based on which the UI component of the app is rendered. The contents of the index.html file are used to render the app in an IFrame at the specified placeholder location.
Default value: index.html (file in the app directory). When you build an app, you can modify the default url value and the name of the index.html file.
Caution:If you modify the template.html filename, ensure to specify the correct path and filename as the url value. - iconstringRequired
Relative path from the app project directory to an image file (in SVG format). The image is used as the app’s icon when the app is rendered on the UI. Ensure that the resolution of the image is 64 x 64 pixels.
Default value: icon.svg (file in the app directory). When you build an app, you can modify the default icon value.
Caution:If you store your app icon with a name other than icon.svg, ensure to specify the correct path and filename as the icon value.
- eventsobjectRequired
Product events that the app must respond to and the corresponding callback function/method names, specified in the following format:
"events": {
 "<eventName1>": {
    "handler": "<callbackFunctionName1>"
 },
 "<eventName2>": {
    "handler": "<callbackFunctionName2>"
 }
}
Subscribe to product events through event listeners: When you build a serverless app, replace the default values in this attribute with the events pertaining to your app. <eventName> is the appropriate product event name. For a list of all compatible product events, see Module introduction.
Register callback: In <callbackFunctionName> enter the name of the callback method defined (or planned to be defined) in server.js. Ensure that for each event, only one callback is registered.
- scriptsobject
Contains the unit testing framework details.
- fdk-unit-teststring
Specifies the unit testing framework to be used when running tests for the app.
- enginesobjectRequired
Node.js and FDK versions that are used to build the app. When you create the front-end app files by using the fdk create command, this attribute value is auto-populated.
- nodestring
Node.js version on which the app is built.
- fdkstring
FDK version that is used to build, test, validate, and pack the app.
- dependenciesobject
All npm packages that the app uses, specified as <npm-package-name>:<version> pairs.
This attribute is not a default attribute. If your app uses npm packages, in manifest.json, include this dependencies attribute and register the packages as dependencies. - appobject
Information pertaining to the app metrics, auto-generated when the app is created.
Note:Currently, this object is auto-generated only when the app uses any Freddy Copilot features.
- trackingIdstring
Identifier for the app.
- startTimestring
Timestamp of when the app was created, specified in the UTC format.
Invoke the serverless component
From the app’s root directory,
- Navigate to the app.js file.
- Define the JSON payload that is to be passed to the method in the server.js file. In the sample app.js code displayed in the right pane, options is the JSON payload that is passed.
- Include the client.request.invoke(“serverMethodName”, JSON_payload) method to invoke the serverless component. By default, the serverless environment adds an iparams object to the payload.
- Include functions to handle the response obtained from the serverless component.
Send response to the front-end component
After the app logic in the server method runs, the server method sends an appropriate response to the front-end component. To enable this:
Navigate to the server.js file. In the exports code block, define the server method that is called from the front-end component. Place the app logic inside the server method.
Notes:- The SMI function name is case-sensitive.
- The SMI function name:
- Can be alphanumeric ([a-z], [A-Z], [0-9]) and can contain the special character underscore ( _ ).
- Should not start with a number.
- Should not contain any spaces between the characters.
- Can be 2 to 40 characters long.
Use the renderData(error, data) method to return a response to the front-end component.
Notes:error and data are passed as JSON objects to the caller method. Ensure that the first argument of renderData(error, data) is always the error object. For success responses, ensure to pass null as the first argument.
error is an object with status and message attributes. data is an object with valid <key>: <value> pairs.
The serverless environment adds a requestID attribute, to the error or data object.
To send a success response, use the renderData() method as follows:
CodeSample responseexports = { serverMethod: function(options) { // app logic resides here renderData(null, { "key": "value" }); } }To send a failure response, use the renderData() method as follows:
CodeSample responseexports = { serverMethod: function(options) { var error = { status: 403, message: "Error while processing the request" }; renderData(error); } }In the response if error.status is not present, the default status code of 500 is used as the error status. If the error object in renderData(error) is of incorrect JSON format, error.status value is 400 and error.message value is The error should be a JSON Object with a message or a status parameter.
The front-end component can render this error as follows:
{ "requestID": "2edc13f8-3b81-4ade-b857-8d8e316fa87c", "status": 400, "message": "The error should be a JSON Object with a message or a status parameter." }Note:If the server method does not return a response, the app execution timeout error occurs.
Test the SMI app
From the command line, navigate to the directory that contains the app related files and run the fdk run command. The FDK starts the local test server. The test URLs to access the product UI, the App Settings page (or Custom installation page), and the URL to the serverless events simulation page are displayed.
Navigate to the system settings page at http://localhost:10001/system_settings. All modules configured in the App manifest are listed.
In the system settings page,
Select the modules for which you want to test the app logic. The Enter account URL section is displayed, with a prompt to enter the account URLs for all selected modules.
The Organization Domain field is displayed, with a prompt to enter the organization domain value for the account.
In the Organization Domain field, enter the domain value from the organization URL for the account. For example, if your organization URL is https://sample.freshdesk.com, the value in Organization Domain should be sample.freshdesk.com.
Note:The org_domain attribute will only be retrieved as a part of currentHost object in app installation page and app settings page.
The Enter account URL section is displayed, with a prompt to enter the account URLs for all selected modules.
In the Enter account URL section, enter valid account URL(s) for the product(s) to which the selected modules belong. During app testing, this URL plays the role of the currentHost.
Based on the currentHost, the currentHost.subscribed_modules, currentHost.org_domain and currentHost.endpoint_urls are determined. In the response payload of the currentHost data method and in the serverless events’ payloads, the determined values are used.
Click Continue.
If you have configured installation parameters for the app, the App Settings page is displayed at http://localhost:10001/custom_configs. Enter appropriate values for the installation parameters and click Install.
Note:If you have not configured any installation parameters, a page is displayed with information on the configured system settings. A message stating that the app does not have an installation page is displayed.
Navigate to http://localhost:10001/web/test to test the serverless events that the app uses. All modules that you select in the system settings page, for which serverless events are registered in the app manifest, are listed in the Select module drop-down.
Note:The payloads of all serverless events that are registered in the app manifest are populated in the server/test_data folder. During the actual runtime, the payloads that are passed to the serverless event contain the currentHost attribute. In the local simulation, the payloads in server/test_data do not contain this attribute. During testing, the modules, account URLs, and organization domain value entered in the system settings page are passed as the currentHost data.
From the Select module drop-down, select the module whose events you want to test. The Select an event drop-down is displayed and it lists all the events configured (in the app manifest) for the selected module.
Note:To test app setup events, select onAppInstall, afterAppUpdate, or onAppUninstall. To test external events, select onExternalEvent. To test scheduled events, select onScheduledEvent.
From the Select an event drop-down, select the event you want to test. The payload for the event is populated on the page.
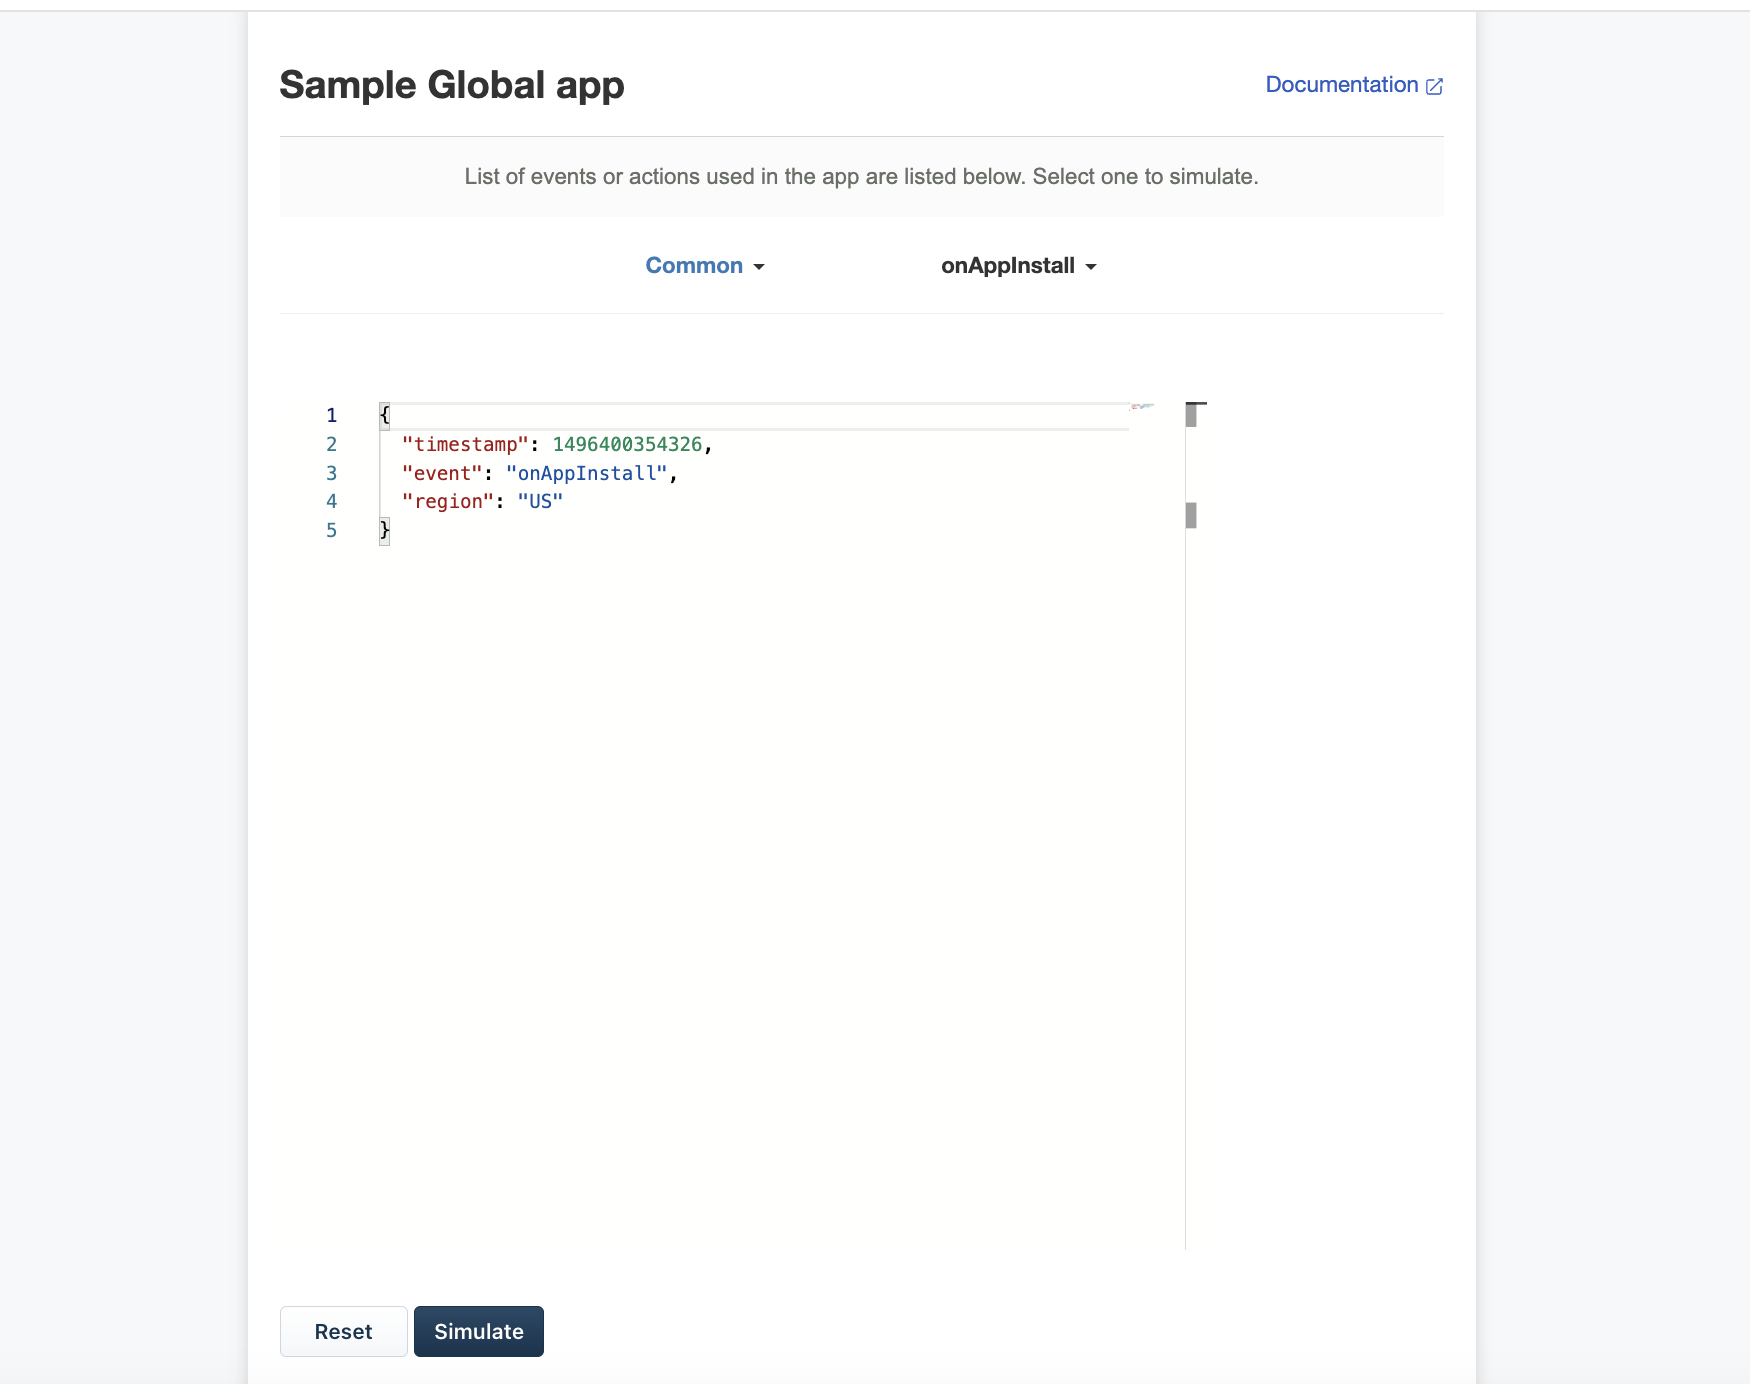 Event simulation page
Click Simulate. If the event is simulated successfully, the Simulate button’s display name changes to Success. The event payload is added to the <app's root directory>/server/test_data folder.
To test more events, select another appropriate module and event and click Simulate. If the event simulation fails because of invalid payload data, the Simulate button’s display name changes to Failed. Modify the payload appropriately and click Simulate.
Log in to the Freshworks product account where you want to test the app deployment.
To the default account URL displayed in the address bar, append ?dev=true.
Example URL: https://subdomain.freshdesk.com/helpdesk/tickets/1?dev=true.
Navigate to the appropriate location where the app is intended to be deployed, verify that the app is rendered, and test the app’s function.
- The code coverage summary from fdk run reflects local simulation testing. For Marketplace submission, fdk pack requires a minimum of 50% coverage for statements, branches, functions, and lines, evaluated individually. If unit tests are configured in your app, fdk pack further requires at least 80% coverage for each of these metrics based on results from fdk unit-test.For more information, see Code coverage.
- When testing your app, if you run into any issue, for a quick resolution from the support team, attach detailed logs of the output in your support ticket.