This document shows how your AI Actions app appears in AI Agent Studio after you install it in a supported subscription. Workflow admins follow these steps to add your app's actions to agent workflows.
If you are building an app, complete Configure AI Actions and test each action locally first. After you publish and install the app, use this document to review how display_name, parameters, and response values from actions.json appear in the live AI Agent Studio UI.
The following example uses a published app named Okta integration with actions such as Activate Device and Assign User to Application.
How your app appears in AI Agent Studio
The table below maps what you define in code to what appears in the installed AI Agent Studio UI. Use it to confirm that workflow admins see the labels, inputs, and outputs you intended.
| What appears in AI Agent Studio | What you define in code |
|---|---|
| App name in Your apps (for example, Okta integration) | App name entered during Custom app upload |
| Action names in the action list (for example, Activate Device) | display_name in actions.json |
| Inputs used in the action preview (for example, deviceId) | parameters in actions.json |
| Outputs from the API | response in actions.json |
Step 1: Create a workflow and add an API action step
- Open AI Agent Studio in your Freshworks product account.
- Create a workflow or open an existing draft workflow.
- Define when the workflow runs in the Trigger this workflow when block.
- Below the trigger, click the + button to add a block.
- Select API Action.
The workflow canvas shows an API action block connected to your trigger.
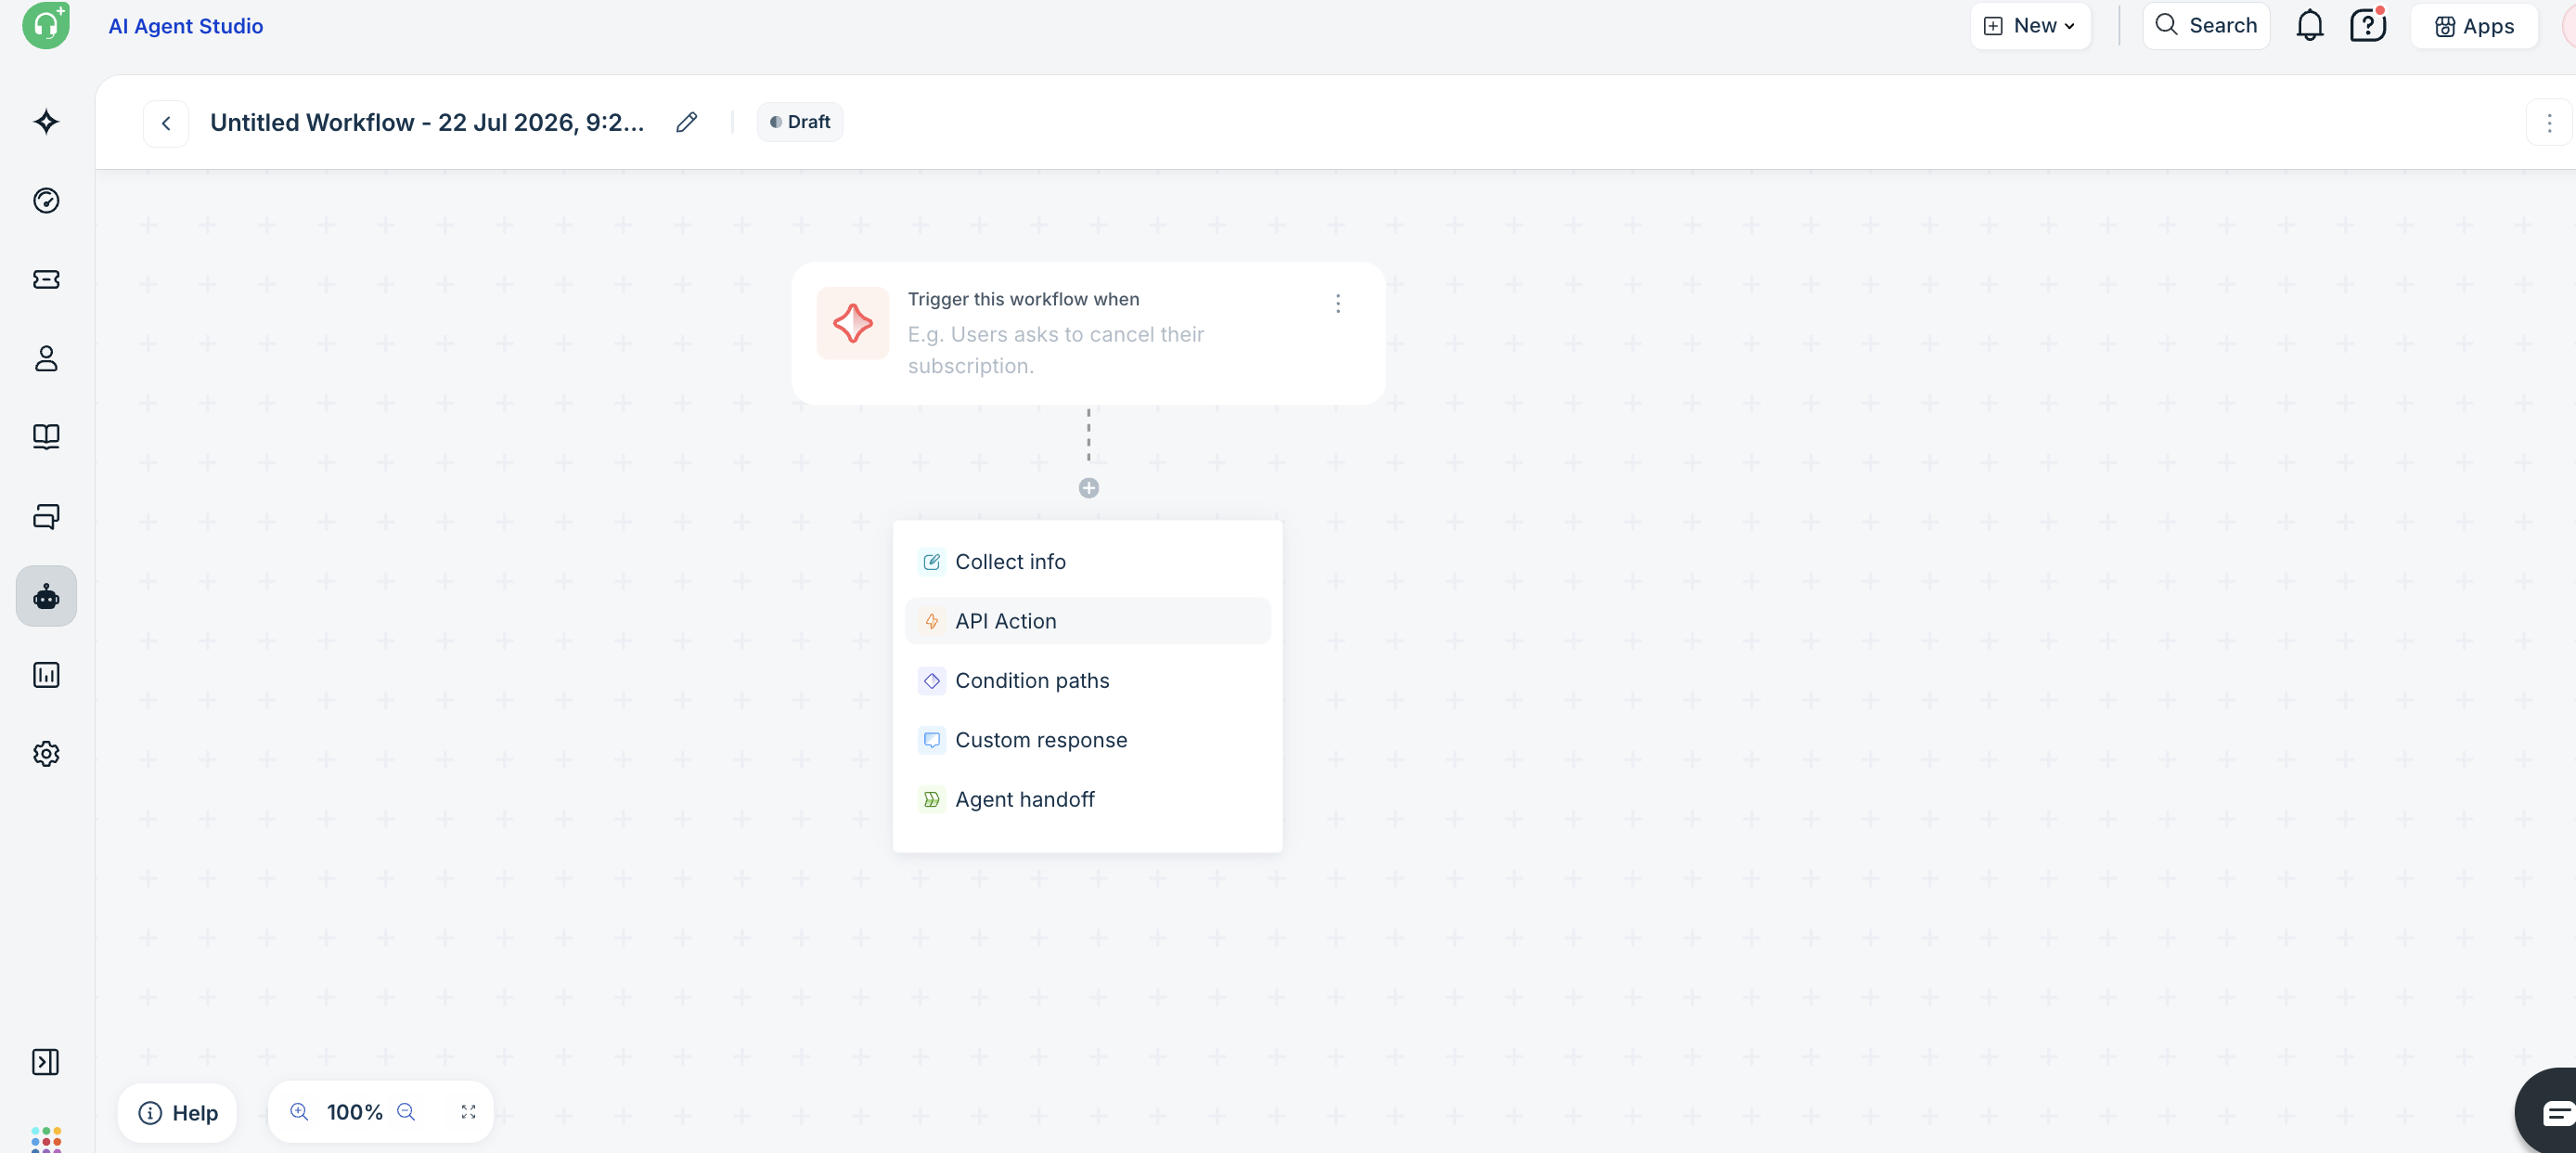 Select API Action as the step type
Step 2: Choose your app
- Open the API action block.
- In Step 1: Choose/Create API action, open the Choose API action dropdown.
- Under Your apps, select your published app (for example, Okta integration).
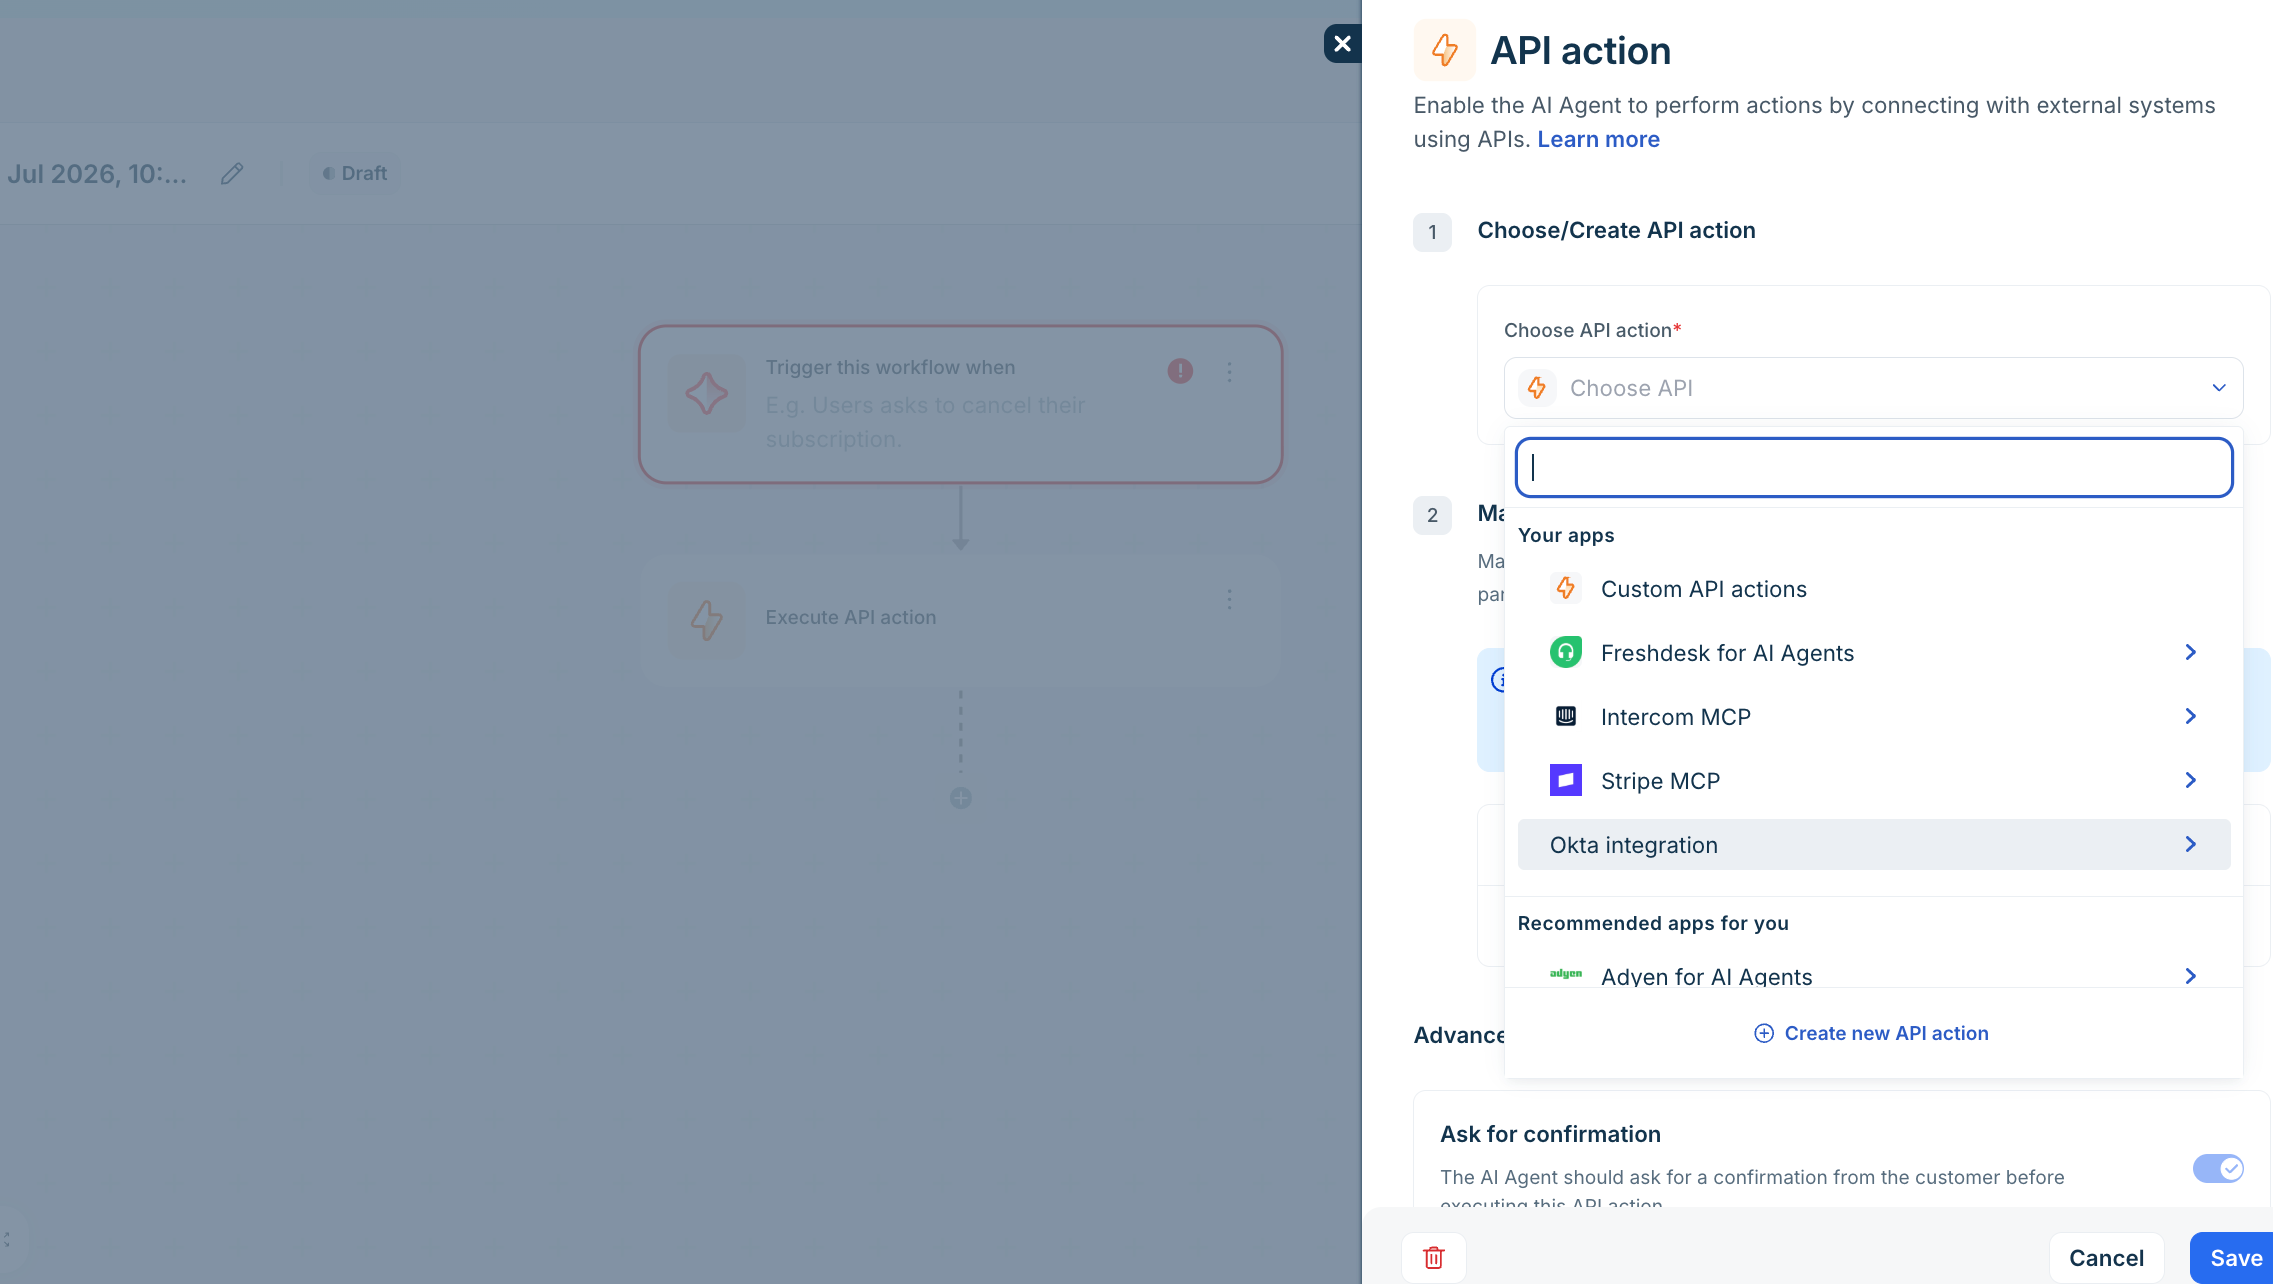 Select your app under Your apps
If your app does not appear:
- Confirm the app is installed in the account.
- Confirm you selected AI Agent Studio under Where can this app's actions be used? during upload.
- Confirm the account uses a supported subscription.
Step 3: Choose an action
After you select your app, the dropdown lists the actions declared in actions.json. Select the action the workflow should run.
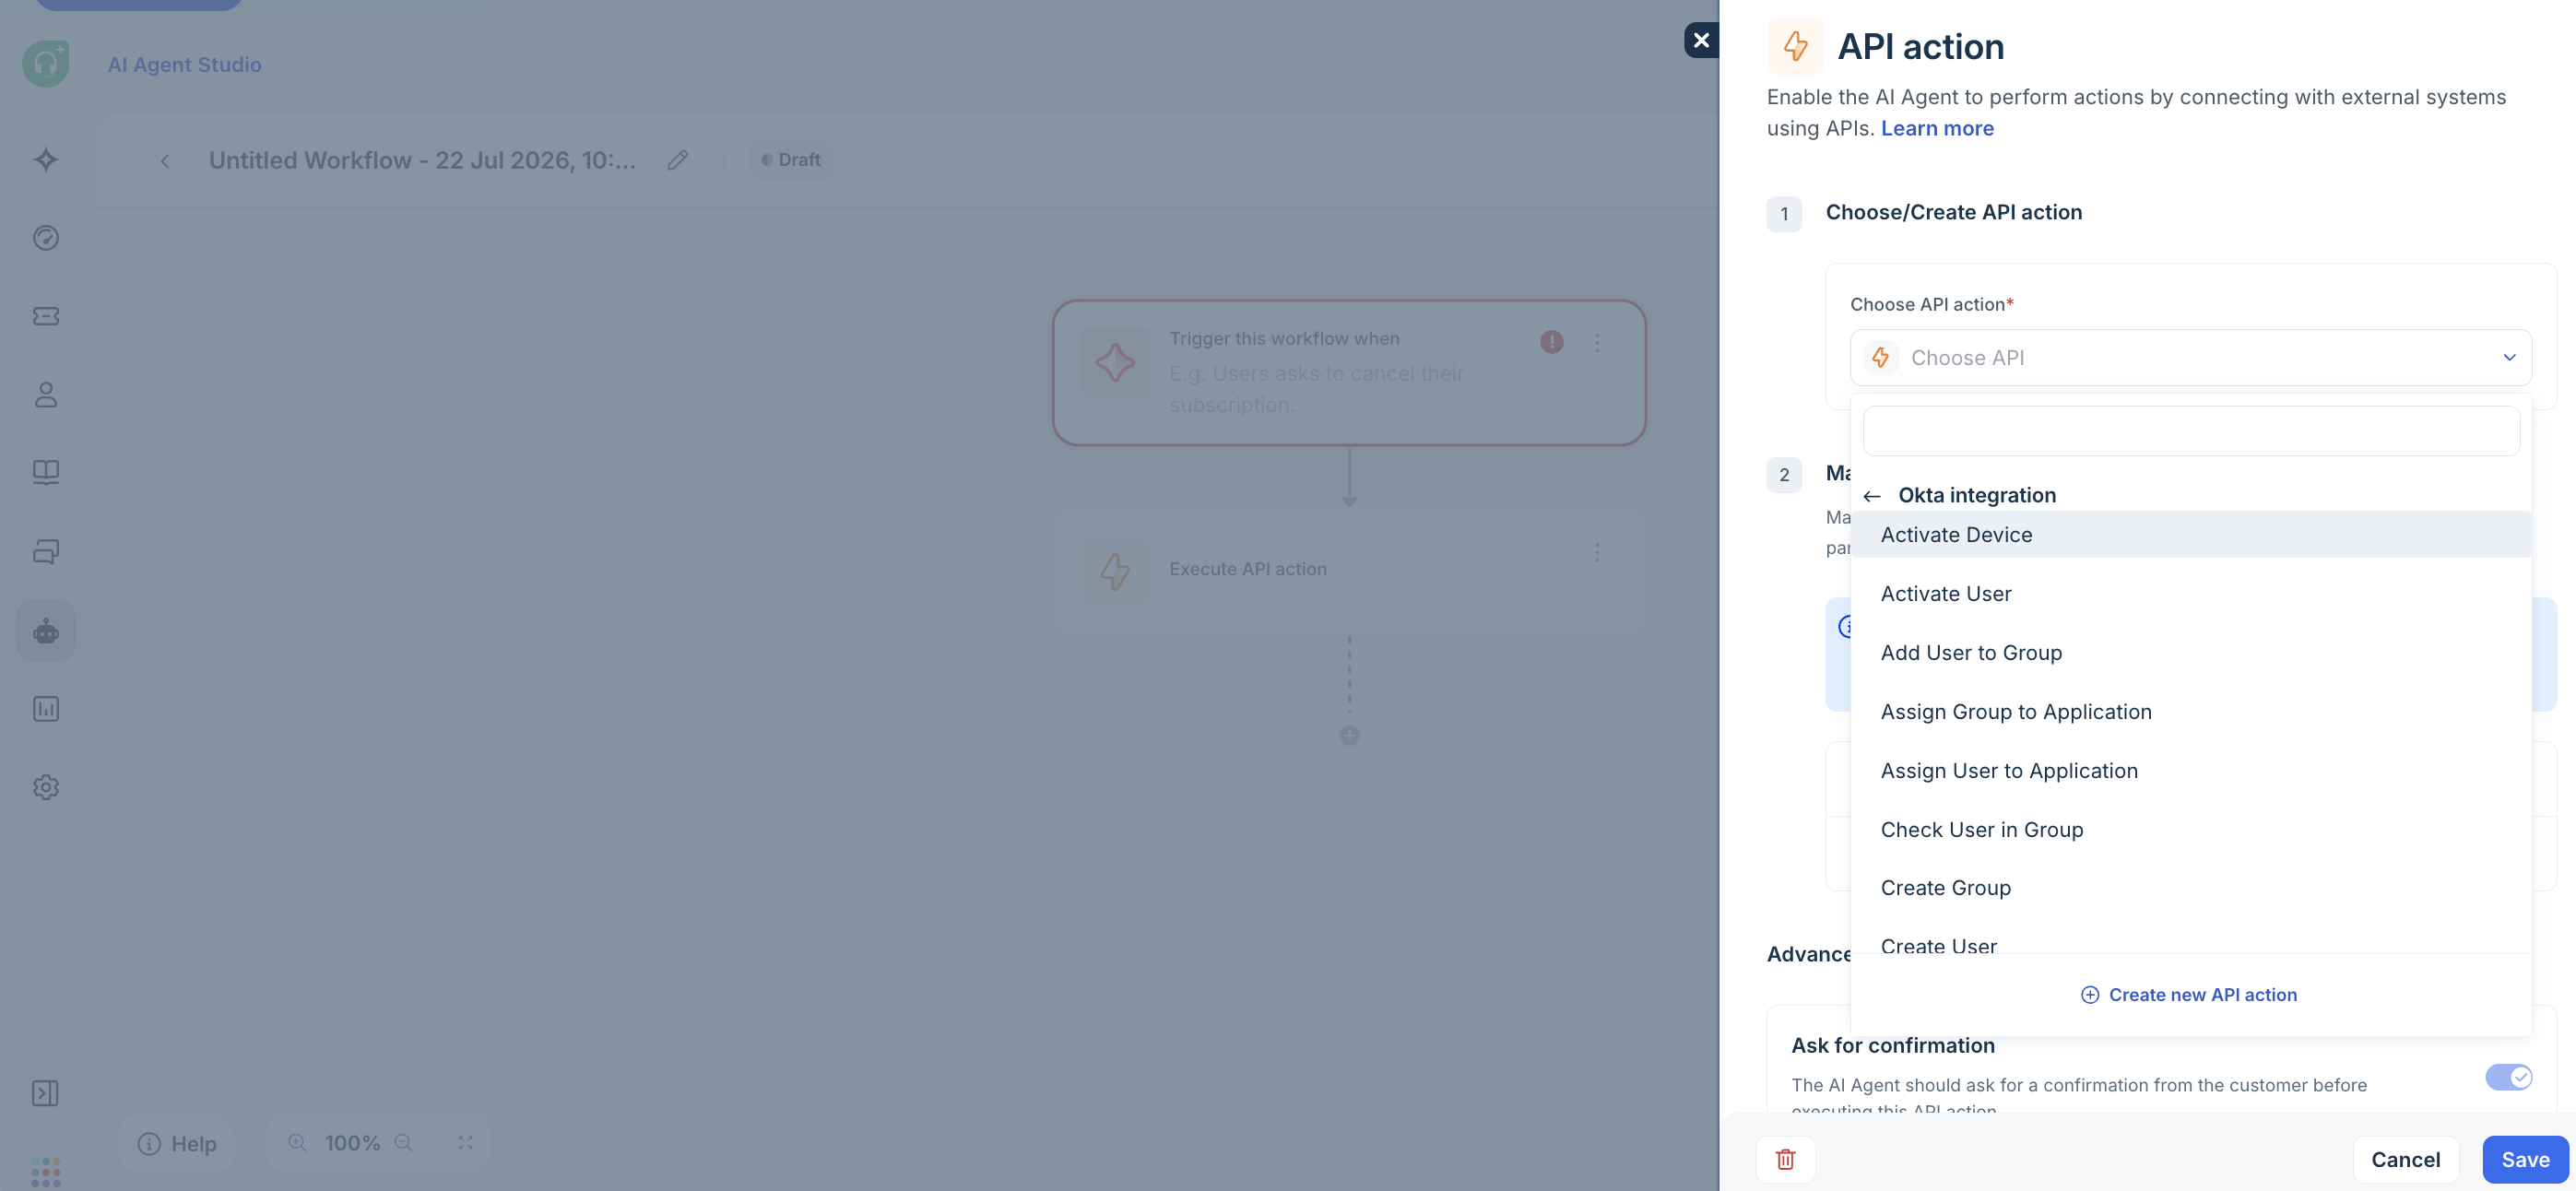 Actions from your app listed under the app name
In this example, the Okta integration app exposes actions such as:
- Activate Device
- Activate User
- Add User to Group
- Assign Group to Application
- Assign User to Application
- Check User in Group
- Create Group
- Create User
Each label maps to an action key and display_name in actions.json.
Step 4: Review inputs and outputs
Open Preview API details to see the action's inputs and outputs.
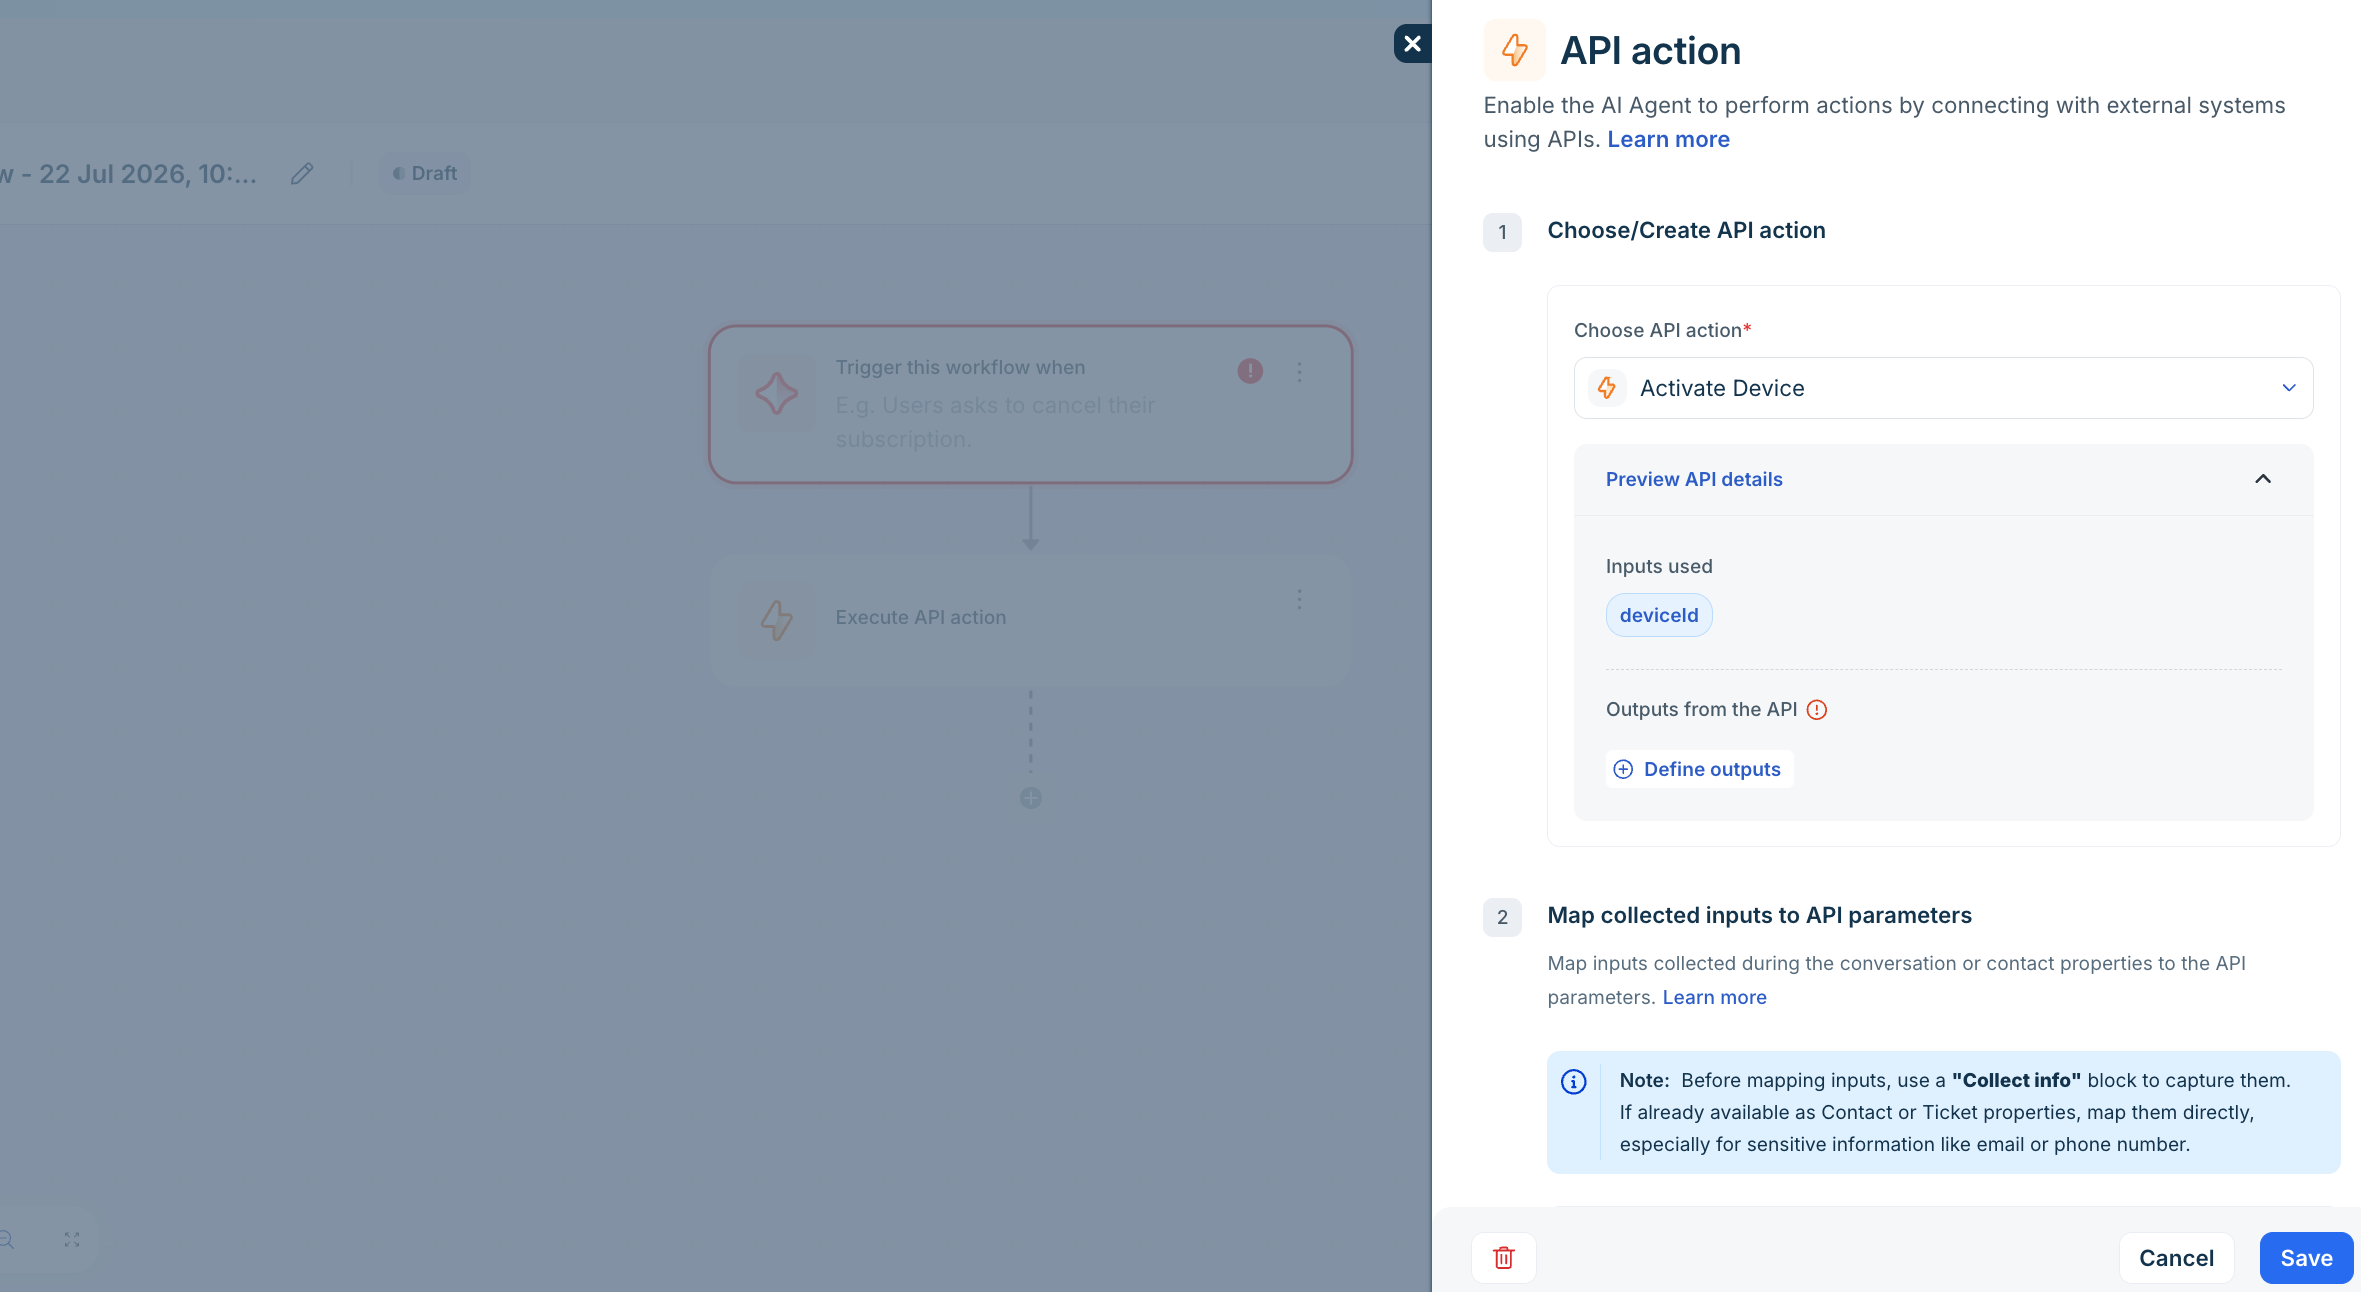 Preview inputs and outputs for the selected action
- Inputs used lists parameters from your action schema. In this example, Activate Device requires deviceId.
- Outputs from the API shows response fields admins can map to later workflow steps. Select Define outputs to choose which response fields the agent should use.
When you define parameters and response in actions.json, you control what appears in this preview.
Step 5: Map inputs to workflow data
In Step 2: Map collected inputs to API parameters, map each action input to data the workflow already collected.
Note:Before mapping inputs, use a Collect info block to capture values from the conversation. If the value already exists as a contact or ticket property, map it directly. This is especially important for sensitive data such as email addresses or phone numbers.
Design action parameters with this mapping step in mind:
- Use short, descriptive parameter names (for example, deviceId, userId, appId).
- Add clear description text for each parameter in actions.json.
- Keep parameters flat so admins can map one workflow value to one API input.
Optionally, enable Ask for confirmation if the AI Agent should confirm with the customer before executing the action.
Step 6: Test the action and define outputs
For custom API actions, AI Agent Studio provides additional configuration under General:
- Inputs to be used
- Test API
- Define outputs
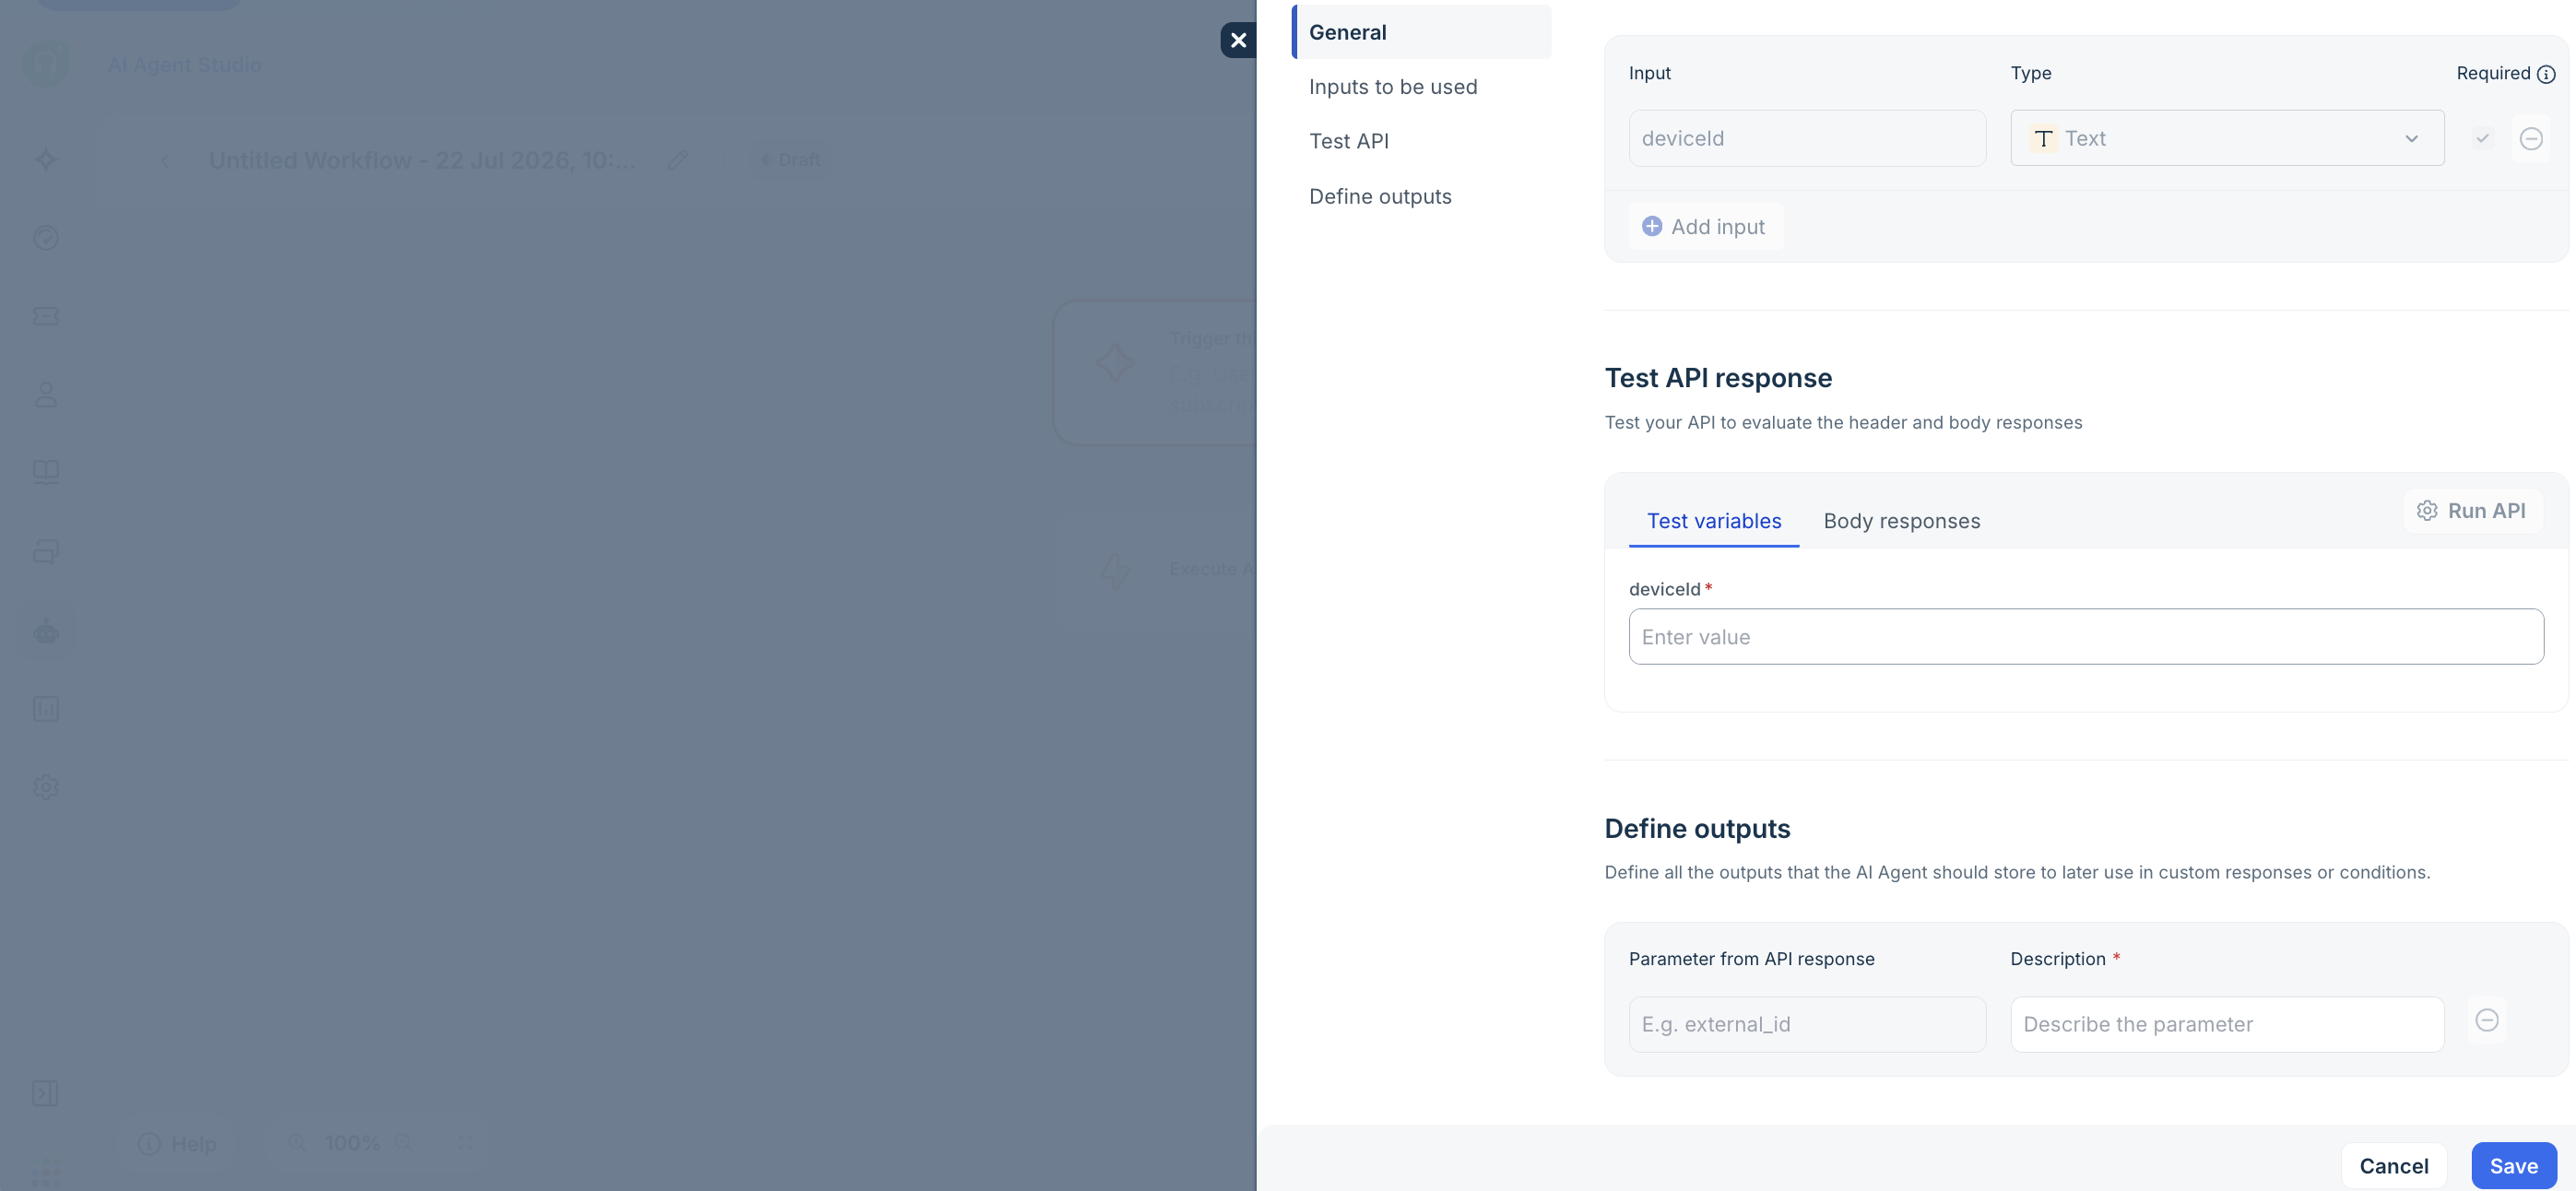 Test the action and define outputsFor developers:
Local testing in Configure AI Actions validates your callback, request templates, and installation settings (iparams or OAuth). Test API in this step validates the full path through AI Agent Studio against your installed app, including labels, input mapping, and the response shape admins see in Define outputs.
For published app actions:
- Use Test API to run the action with sample input values and inspect the response.
- Use Define outputs to select response fields the workflow can reference later.
- Click Save to store the API action step configuration.
Return to the workflow canvas, complete the remaining steps, and publish the workflow when testing is complete.
Troubleshooting in AI Agent Studio
| Symptom | Likely cause | Resolution |
|---|---|---|
| App missing from Your apps | App not installed or wrong upload target | Install the app and confirm AI Agent Studio was selected during upload |
| Action missing from the app list | Action not declared or name mismatch | Verify the action exists in actions.json and is exported from server/server.js |
| Input not available for mapping | Parameter not declared in actions.json | Add the parameter to the action schema with a clear description |
| Define outputs shows a warning | Response fields not configured | Expand Define outputs and map the response fields your workflow needs |
| Action fails at runtime | Handler, template, iparam, or OAuth issue | Test locally using the Test section in Configure AI Actions before republishing |